Showing posts with label bra sewing. Show all posts

Thursday, February 1, 2018

Sewing Bras - Lace Shelley Bra - aka Bra Seam Manipulation


Its been a while since I've sewn up a regular underwire bra (2+ months!) while I've been focusing on the Strapless debacle - which lead to learning to draft a bra from scratch (multiple times!). [Check out my strapless bra adventures HERE].
Now that that major project has finished, I wanted something a bit simpler to work on.  Utilizing my new skills, I decided to turn my PUG Classic into the PUG Shelley Bra!  The drafting should be pretty simple - create a power bar out of the upper and lower cup pieces and then split the remaining lower cup.  Creating the power bar has the same steps as creating the internal power bar I talked about in a previous post.  [see HERE]  And splitting the lower cup is a fairly common alteration with a number of tutorials on the interwebs. [like HERE and HERE].  What will be new is making this bra almost entirely of lace!
I really like the delicate look of this bra.  It is such a nice contrast to the VERY structured strapless bra I spent the last few months on.  Working with lace came with its own trials and tribulations but sooo very worth it in the end.
ALTERATIONS TO PATTERN
  • Manipulated seam lines on the Pin Up Girls Classic bra to mimic the Pin Up Girls Shelley bra
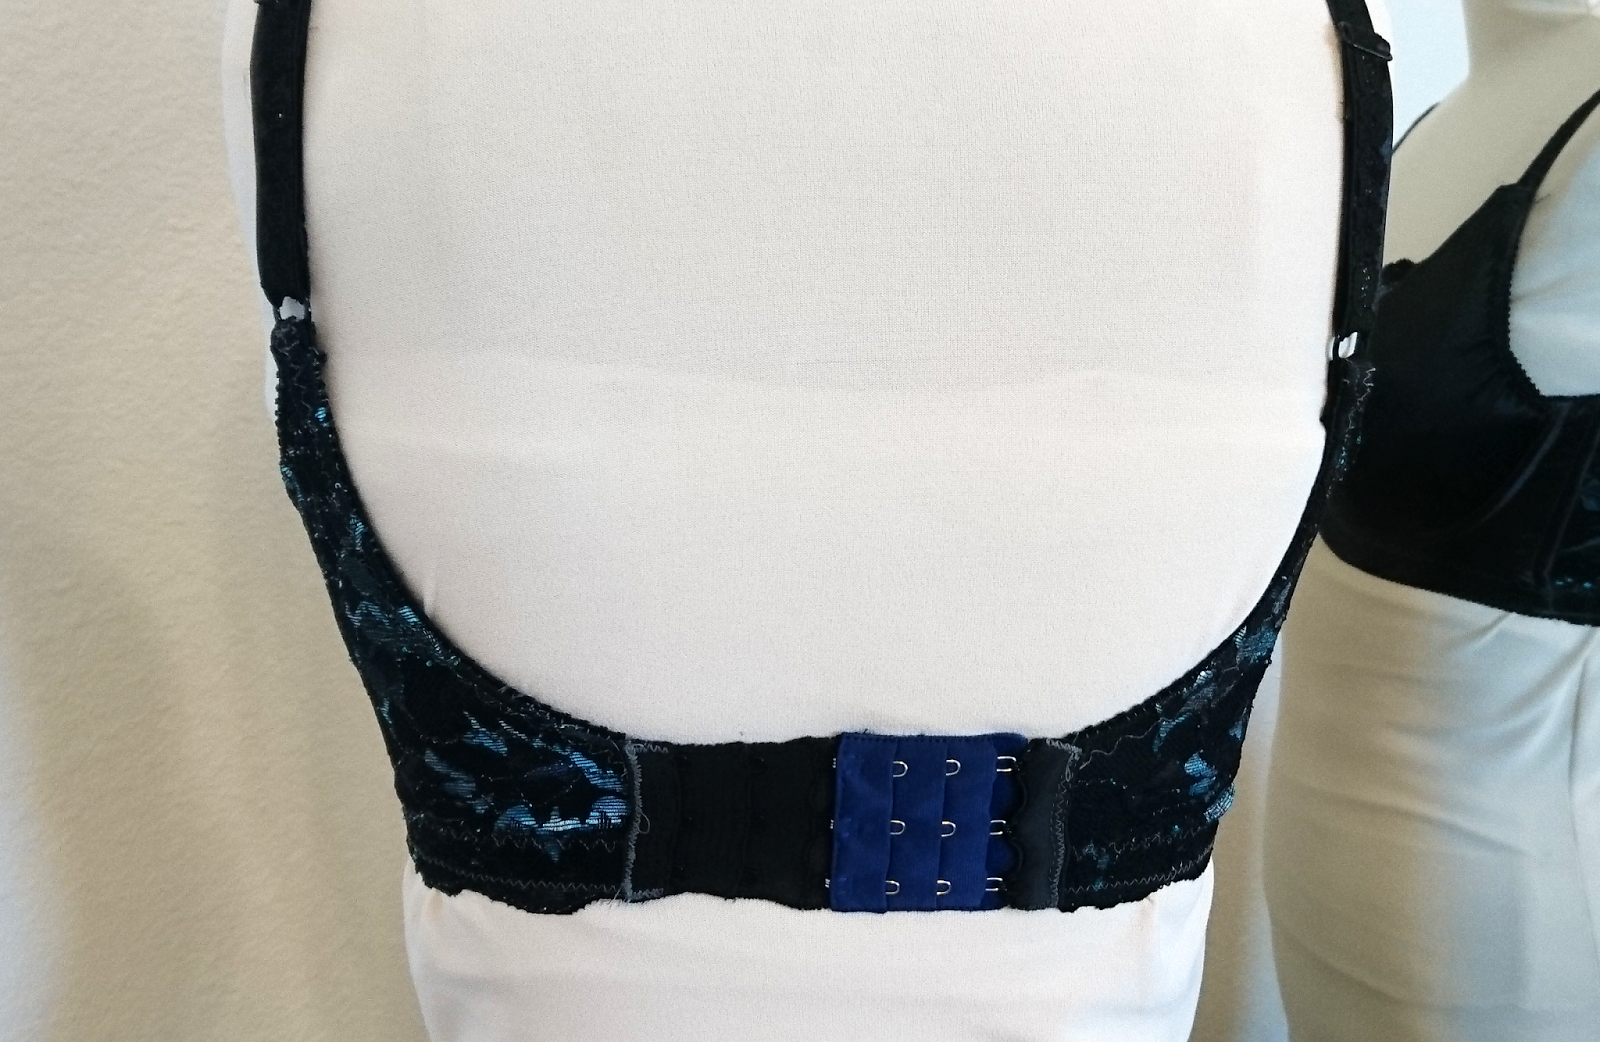
  • Raised the side wings roughly 1/2" and tapered down towards back band.
  • Used alternate straps that calls for fabric to be folded down the center.
  • Manipulated the cradle to accomodate the lace
  • Inserted Gothic Arch
FOR NEXT ROUND
  • Widen the powerbar near the lower cup a bit.  Roughly 3/4 - 1".  Repeat for internal powerbar.
  • Lengthen the folded straps and remove the seam allowance along the neckline.  If using heavy duty upholstery interfacing again next time, use only a SINGLE layer.  The strap ended up quite thick at the attachment point.  Or perhaps try padded straps again.
  • Take a TINY 1/8" sliver off along the wireline for the inner lower cup pattern piece.
The fit is wonderful.  The cups are slightly more rounded (due to the extra seams) than the original.  It's my best fitting PUG Classic/Shelley bra yet!  This mostly stems from me *actually* applying my (newly acquired) knowledge of bra fitting to myself than the lace or construction.  Although according to the wire chart, I should be using the bridge from TWO sizes up from what I had been using.  I compromised by only going up ONE size (which also happens to coincide with my RTW size). The only thing I will add is that changing the cradle, while more comfortable, gave me a more natural look where the girls are not set as close together.  So neither pushed together, or facing East/West but perfectly parallell.

Thursday, January 25, 2018

Sewing Bras - Custom Drafting a Strapless Bra Part 3

Welcome to part 3 of my custom draft strapless bra!  [Check out Parts 1 HERE and Part 2 HERE]

IT IS DONE!


Feels sooo good to have finally finished it.  Well, mostly finished - I'm still waiting on some more black hook and eye tape but the white I put in temporarily will suffice for now.


The color combo didn't quite turn out as I had hoped but is fine for a serviceable strapless bra.


Check out that lace!  I wanted some continuity between the front purple section and the back black powernet.  Stretch lace placed on the diagonal did the trick!

This bra was definitely a labor of love.  There were challenges and quite a few firsts all around.  This bra features 4 bones in the band and 4 bones in the cups.  I added self made cookie inserts and sewed them to the cup in a free floating fashion.  The cups themselves had dual layers of foam - to ensure a smooth exterior despite all the boning.  I also had to shorten the U shaped or Strapless underwires a smidge (1/4") at center front to make it fit.  Band feels a bit loose to me and more secure on the tightest set of hooks.  Silicone elastic across the top of the back band would have helped immensely (I had 3/4" regular plush elastic or 1/2" silicon - I erred on the 3/4").


LESSONS LEARNED
- If adding cookie inserts, make them removable next time.   If for no other reason than to avoid sewing through 4-5 layers of bra foam.
- If adding inserts for more push up, lower the height of the upper cup (even more).  Possibly curving it a bit higher towards the arm pit. Current cups + 4 layers of foam (4 for the inserts and 2 for the cup) = slight quadding. Zero quadding without the inserts.
- Consider adding another set of boning in the back band over the powernet.  This will likely need to use channeling to allow the bones some movement.  Previous experience sewing boning on powenet was less than spectacular.
- Consider reinforcing the top edge of foam cup with tricot or similar non-stretch material - hopefully this will help resolve the rolled edge issue.
- Use higher quality plush elastic or just FIRM plush elastic as quite a bit of the support comes from the band.

POSSIBLE EXPERIMENTS FOR NEXT ROUND
- Shorten the u-shaped wires even more (evenly on both ends AND/OR shorter in center front). Maybe another 1/4" off each end?
- 1/2" Silicon backed plush elastic.  The concern with this one is the difference in elasticity.  I've found I need a fairly firm elastic for the upper band elastic to spring the wires correctly.
- Possibly shorten the back band 1/2" to account for the extra stretchy plush elastic (I bought 50 yards of this stuff that stretches almost 100%!!)


Overall, I'm very pleased with how this turned out!  Fit is pretty darn good if I do say so myself.  My issues at this point are all very minor.  Hooray!


Monday, January 22, 2018

Tutorial - How to Create and Insert a Bra Sling

Welcome to my first tutorial!  (pic heavy)

After hailing the wonders that is a bra sling, I received a number of requests to for a tutorial.  For those who are not familiar with a sling, it is a separate piece of fabric on the interior (or exterior) of the bra to aid in support. Sometimes called a side sling and look similar to powerbars.  Here is a VERY comprehensive series of posts on power bars, internal slings and external slings [link HERE] by Silver Lining Atelier.

(From L to R) Satami Lace Bra 2196 non-stretch sling sandwiched in cotton knit and Panache Andorra non-stretch sling.

In today's tutorial we will be adding internal slings to the very popular Watson wireless bra pattern by Cloth Habit.  I highly suggest this modification if 1.) you are of a larger bust and still want support in a wireless bra and/or 2.) your girls are a bit saggy and need some additional vertical assistance and/or 3.) your bust point tends to face east/west and you would like them more centered.

You will need the 2 cup pieces to begin.  Draw a line 1/4" away from the edge - this will indicate the seam or sewing line.  I've drawn short dotted lines in red.
***[Ignore the other lines - this is my modified version of the Watson where I've moved the cup seam more toward the Center Front and raised the height of the side wings.]


Now stack one piece on top of the other aligning the seam line.  You need to eliminate the seam line as we will be making our sling in one piece.


Tape them together.


Here's the fun part - deciding what you would like the sling to accomplish.  There is ONE main rule to keep in mind here - avoid the apex of the cup. Not only can it be uncomfortable having a free floating piece of fabric so close to a sensitive area, it is also more likely to be seen from the outside of the bra.

I'm using one of my corset bones to indicate where you would like the internal edge of the sling to end.


This version pushes the breast tissue toward center front and is the version used in the Panache Andorra.


This version pushes the breast tissue up and is sometimes used in wired sports bras.


This version pushes the breast tissue both up AND forward.


Once you've decided what shape (and function) your sling will take, draw your line (as indicated by the corset bone) and trace.


Add a line to indicate direction of greatest stretch (DOGS).  It should be perpendicular to your straight line.  You want there to be almost NO stretch along your straight line as that's what provides the support.

Last step would be to decide what material to use in your bra sling.  Both RTW examples in the title photo utilize non-stretch fabric, but I have personally also seen bra foam (regular 1/8" poly laminate foam covered in stretch knit placed on fold) and powerknit/powernet on the fold.

Today's example uses firm powernet (45% stretch doubled => 30% stretch). One of the reasons I used powernet this time instead of the Simplex (like I've done in the past) is due to proximity to the bust point (see photo above) and my desire to for the sling to be as invisible as possible.  The knit used in today's tutorial is VERY soft and such a drastic difference between stretch percentages would likely be obvious.


 Cut out your new internal sling and attach to your cups PRIOR to sewing into cradle. Complete the remainder of the steps as usual.


OPTIONAL: You can also use the same internal sling pattern for a lace external sling!  The straight edge works really well along the lowest point of scalloped lace.

And here's the finished piece!


A few pics of the finished interior.  The bra channeling is optional as this is wireless (although a short rocker wire also worked well for me!).  I added it for a cleaner look.


Friday, January 12, 2018

Sewing Bras - Custom Drafting a Strapless Bra Part 2

A quick update on my Strapless Bra drafting adventures.


Since my last post, my fitting problems were as follows:

#6 - cups are no longer pointy but tilt downward toward the armpit despite ensuring marks on the cup lined up with the marks on the cradle. Needs to be taken in a smidge at the cross seam near center front.

#7 - bra band is ridiculously huge.  It measured 30" unstretched - and that included a 12.5% negative ease for the elastic (which incidentally, I apparently pickup that percentage out of nowhere)


I had finished redrafting the bra band to better suit my tastes last round.  The fit is significantly better with 2 caveats.  1) The elastic I am using is much too stretchy despite being 3/4"!  It stretches 100% easily.  2) The single layer of powernet may not be enough for what I am looking for.  Will entertain doubling the powernet.

#8 -  tilting the cups within the frame too see if it would be enough to off set the odd angle.  

The cups pointing downward (like a sad puppy) was quite vexing.  After a good night's sleep, I tried on the bra again and noticed a few things I didn't previously. The bridge was too wide near the top and too narrow near the bottom.  AHA!  I had forgotten about the ONE alteration I always make to bra patterns as it is a necessity in order for the bridge to fit properly. Goodness I felt silly.

#9 - took in the center gore at the correct angle for my typical adjustment.

AAAAND.  Still sad puppy cups.  I had to step away for the rest of the day.  

During my break from sewing, I got to thinking about Natasha's Underwire Theory [link HERE] on her blog.  Specifically she talks about the importance of accounting for wire spring when drafting.  While she doesn't walk you through all the steps of how to draft the bra bridge, the focus on wire spring included a different way to account for it as well as thorough explanations that I found extremely helpful. The most important lines I found was this:


"... a wire should be sprung 15mm and while this seems to be commonly repeated I have found through further education and experience that 15mm is not necessarily a rule. In many cases, it is the minimum amount of wire spring that should be added and it is possible to add up to 55mm of wire spring." - www.bramakingblog.com


compared to:


"Test the amount of splay in the wire by holding the front arm of the wire and flexing the side outward. Make a note of how much it splays. Trace the wire and then pivot the wire back the amount of the splay toward the side seam, using the bottom of the curve as a pivot point. Trace the new curve and use it for your bra draft. " - Bra-Makers Manual Vol 2.


In essence, they are both stating the same thing.  Bras need a little extra space in the channeling to account for the wire spring.  Wire spring can differ depending on the size(length) of the wire.  It would have helped my case IMMENSELY if the BMM had stated a 15 mm (smaller cups) and 55 mm (larger cups) as examples.   I would have realized that my spring of 5 mm was much too small.

Here is the result of drafting with too small a spring vs the 15 mm.


The overall curve is flatter with the 15 mm vs the 5 mm as one would expect.  However, it also LOWERS the overall height.  In my case, a wire spring (using a U-Shaped wire)  of 5 mm results in a center gore that was TALLER than the underarm - causing the droopy sad puppy eye cups!!!  Hallelujah!


Green line is perpendicular to center bridge - note how one side is taller than the underarm side.

So, I think we're finally ready for some real lingerie fabrics and lace!  Many thanks to Natasha and the fabulous people on the Bra Making Forum!  This has definitely been my biggest bra making challenge yet!

Tuesday, November 7, 2017

Sewing Bras - Designing a New Style Based on a Well Fitting Pattern (aka Block)

Now that the Costume Season (aka Halloween) is over, lingerie sewing has resumed its full course. Yay!

In my pursuit to further my (bra) education, I've decided to try out a new style with different materials.  As I am not quite ready to completely draft my own patterns from scratch, using a well fitting pattern (aka Block) seemed like a step in the right direction.

I really liked this style of bra: integrated powerbar/lower cups with strap tab with small section of lace upper. Add a few minor tweaks to suite my particular preferences (lower center gore and foam lower cups) and its perfect!
[Cleo Lucy, Gorsenia Marlene, and Freya Arabella]
As I already had a great fitting foam bra pattern (my fabulous Comexim copy - details Here), I used it as my block.  Following the directions from the Bra-Makers Manual (Vol 2) by Beverly Johnson, I ended up with this:


Basically taking the curves off, draw new lines then add curves back on. [You can see a bit of this in action on Erin's Blog Here] A quick muslin (just one cup) then basted into my test band, and we were ready to for final adjustments.

Here's the final!  I'm super spiffed.


THE PROCESS

I cut out the lower cup pieces in cut-and-sew foam and identical pieces in my fashion fabric.  The satin-y material is wonderful under fitted clothing. For the upper pieces, I used a stretch lace from Trim Expo during my last foray into the Fashion District (Nice selection, great prices!). Then cut the same pieces in bra tulle for the lining.  Since I wasn't using a pattern with accompanying instructions, I assembled the pieces together in the order that made the most sense to me. Zig zag foam pieces together then sew lower cup fabric pieces together. Baste tulle and lace together, add tiny elastic for neckline, sew combined upper cup piece to combined lower cup pieces.  Sew just the strap tab portion of the fabric to the foam (right sides of fabric to wrong side of foam) then flip open. With wrong side of fabric facing up (and right side of foam), overlap the fabric and foam a few mm and sew INSIDE the seam allowance.  Flip over and top stitch on the cross seam.  Pin down lower edges of fabric to foam and baste.  Finish as usual.

A few minor tweaks to the band - added a gothic arch and doubled up on the power mesh in the back.  Also some adjustments to accommodate the lace on the back band.


THE FIT

I am pleased to report it fits! [with caveats].  Cups fit wonderfully - a little too good as this is definitely a push up bra w/ lots of cleavage.  Since I used the Comexim pattern, the girls are lifted and centered without the help of any additional padding or internal slings!  The gravity defying shape was created by relatively FLAT cups (the cups gain shape when they conform to the underwire) - contrary to everything I've read about bra making thus far.  Immediate projection at the wire is non-existent - this would normally cause major fitting issues for me but not in this time! The bust point of Comexim bra cups tend to be above my bust point (I believe this is by design) and was also perfect for this particular re-design.


THE PROBLEMS

My myopic focus on the cups had caused some oversight on the band.  1.) I had raised the height of the wide wings (for that super sleek silhouette I crave) but had forgotten to raise the back band as well.  Thus the band only has 3 hooks in the back, caused some lumps and bumps. 2.) I had also doubled the powermesh for the back band AND added stretch lace resulting in significantly less stretch.  Thank goodness I had one of those bra extenders handy! 3.) The shorter back band also made the back straps too far apart. Sigh.


Overall I'm very pleased.


Friday, October 27, 2017

Sewing Bras - Starting with a Underwire Bra Block

Hello again!  Its been a few crazy weeks with the Halloween coming up - which means significantly less time for bra sewing and more time costume sewing!  At any rate, here is a bra I finished just before the rush began.


This is a free pattern from Bra Essentials (available in sizes 30A to 40F).  I initially wanted to try this mostly because it was free (and given the good experience I had with the free Maya pattern) but noticed quite a few things were off.  The bust point seemed to be dead center in the middle of the cup vs toward the center front, upper cup was too tight, wrinkles at the wire etc, etc.  Seemed to be an excessively long list of things to correct.  As I pondered some more (and inquired on the trusty Bra Making Group) it occurred to me that this pattern may be a Underwire Bra Block. Which makes perfect sense as this PDF pattern had zero instructions with it.  Definitely NOT for beginners.


WHAT IS A BLOCK?

According to fashion-incubator.com, they define it as "A block is the pattern of a style" and "promising fit to key dimensions of the average sized consumer" according to the book Innovation and Technology of Women's Intimate Apparel By W Yu, J Fan, S-P Ng, S Harlock.


THE PROCESS

I was inspired by a gorgeous sheer bra with curved lace inset that
ended above the horizontal seams and center set straps (vs the ever popular wide straps). But before I can get to the fun design aspect, I needed to get a proper fit. Given the long list of alterations needed, I was surprised to do everything with the help of a only 5 muslins! Muslin #1 addressed the bust point - it thankfully also took care of a significant number of wrinkles in the cups which likely attributed to the small number of alterations. Muslin #2 and #3 addressed upper cup being too small. Muslin #4 changed the strap attachment shape to better mimic my inspiration bra and a small wrinkle at the wire typical to my body type. Muslin #5 adjusted the strap attachment a smidge more and tried the curved illusion technique using lycra instead of lace - then it was ready for the fashion fabric! Not included were my usual adjustments specific to my shape and preferences: narrow gore at the top and widen at the bottom, increased width of the back back for a smoother silhouette. I also added my very first Gothic Arch along the bottom band!


PROBLEMS ALONG THE WAY

The band sewed up easily along the way - including the gothic arch. I got to do a practice run with my last muslin which definitely helped! Issues began to arise as I was working with the lycra. I had ran out of lace (after my first attempt making this pattern with my good fabrics) and thought I'd give this piece of lycra a go in place of the lace. Well, the lycra behaved differently being sandwiched next to the bra cup netting than my cotton muslin fabric and the finished bra had extra wrinkles from the lycra layer. I was able to hand sew the excess in to the wireline with a bit of effort. Lastly, related to the fabric choice was the thread tension as I sewed the horizontal seam - the seam itself is too tight. Bra fits but seam is more noticeable than it should be.


So here it is with some matching panties! Completely wearable and pretty comfy if I do say so myself. Just don't look too closely. =)


Saturday, September 2, 2017

Sewing Bras - More Watsons! An experiment in stretch and support

I'm on a Watson kick!  After making my first retro inspired wireless bra and discovering how COMFY it is, I quickly made a few more (including one as a gift!).  In this iteration, no alterations were made to the pattern, just different fabrics and powernet.  All three were make in size 32F (I'm usually a 32E/F in UK sizes).


FABRIC BREAKDOWN
Striped Watson - Slighter heavier Medium weight Knit with FIRM powernet through out.  Fabric has the recommended 75% stretch. Brief pattern from Bare Essentials.

Red Watson - Medium weight Knit with doubled fashion fabric - NO powernet.  Fabric has the recommended 75% stretch. Brief pattern from Bare Essentials w/ modifications.

Blue Watson - Medium weight Ribbed knit with LIGHT powernet throughout. Fabric has the recommended 75% stretch. Bikini pattern from Watson Kit.

Power nets - Light has about 100% stretch, Medium about 50% and Firm about 30%


FIT
While both the Red and the Blue Watson were comfy around the band, the cups from Blue Watson fit better.  It provided more coverage and moved with the body better.  The Red Watson was a close second with the cups ever so slightly too small.  Time will tell how the Red Watson holds up as without the powernet, will likely loose its elasticity quickly.  The Striped Watson was simply too small in the cups.  This is likely due to the FIRM powernet not having enough stretch.  After actually WEARING the Striped Watson for a day, I revise my statement. FIRM powernet does have some stretch and conforms to the body after a short while. I no longer feel like I have side boob and the Striped Watson provides the most support in the band AND the cups.  The girls looked perkiest with the FIRM powernet but also oddly squished - this is likely due to the cups being too small as the pattern was designed for fabrics with significantly more stretch and is the powernet I would recommend for those with larger cups.  I can easily wear this out on short trips without worrying about headlights. In all three cases, I added plastic boning to the side seams to help keep the band from rolling up but also helps with support (especially with larger cups) and overall silhouette.  Once on, I found the side boning to be un-noticable and was able to sleep with no problems.

For ladies who are on the larger cup side, I would highly recommend the FIRM powernet for the bridge/band and either MEDIUM power net for the cups or FIRM but GO UP A SIZE.  I would wager that the best configuration for those who are more well endowed, would be FIRM bridge/band and Medium cups.  This will be the combo I try next.

Here's the reason why:

Those are fine threads of lycra/elastic coming apart at the seams of the LIGHT Powernet from my first Watson (LIGHT powernet in cups, MEDIUM powernet in band with Knit Terry fabric)  I've worn it twice, washed once.  Its possible the LIGHT powernet simply cannot support the weight of larger cups.  No matter, its super comfy and I will likely continue to wear it until it falls apart.  Given I will likely only wear my Watson's at home AND the fraying is on the inside, no one can tell.

Woo!  And now I have a few matching sets for lounging around in this 100+ degree weather!

Saturday, August 19, 2017

Sewing Bras - Watson Bra Pattern by Cloth Habit

I took the plunge!  Tried out the VERY popular Watson Bra Pattern by Cloth Habit.  And boy and I glad I did!


Easy to sew and SOOO comfy.  You better believe I'll be making more of these babies.  I forsee nursing bra conversion, maybe a cami overlay version, lace... so many possibilities!


No alternations needed. Zero! Fabric was a knit terry from my knit stash I picked up for cheap ($2/pound!) in downtown LA last year. I used lightweight powernet in the cups and medium weight powernet in the band. Elastics from Sew Sassy. To keep things a little neater (and comfort),  I did use wire channeling to cover up the cup seams though no wires were used.  The bows were necessary to cover up the mess at the top of the cups due to not following instructions. 😑


Money well spent. I'll definitely be making more! 

Friday, August 18, 2017

Sewing Bras - Pinup Girls Classic Bra Pattern

Yay! My order from Bra Makers Supply came in! In addition to their very popular Classic Bra Pattern, I also picked up the Bra-makers Manual volume 1 and 2.


Feeling brave after reading the thorough instructions and hearing about all the great reviews about this pattern, I decided to sew it up without making a toile first! It's SOO nice to read sewing instructions that are not only well written, but geared toward beginners. Although I've sewed a half dozen bras already, the methods I used were gathered haphazardly - a few sew-alongs, an online video, random  Google searches on specific techniques. I can definitely see why so many people recommend this pattern as their first foray into sewing underwire bras - makes wonder why I didn't choose it myself.  There is something to be said about paying for a well made sewing pattern and the accompanying instructions. Nevertheless, the tidbits helped improve my sewing - creating neater stitches and more refined workflow.


BRA SIZE
I did a bit of research to see how others chose their size as the size recommended using the instructions yielded 32A... It gave me chuckle as I haven't been a true A cup since high school. After stalking her (Beverly Johnson's) blog, I found this link. She discusses the 4 common ways to measure for bra size, as well as their pro/cons. While she uses the underbust/overbust method most frequently, she freely admits it doesn't work well for petite women. She did mention that the  Bottom Cup Depth method is the most accurate and I agree with this. Luckily, the BCD measurement yielded the same bra size as the ABTF calculator in my case - now a 32E (post weaning).

CONSTRUCTION AND ALTERATIONS
The bra sewed up pretty quickly - no  linings or lace to fiddle with -  and true to unlined bras, easily showed you where adjustments needed to be made. Initially, it looked like there was too much projection the cups as the apex wrinkled but seemed to fit everywhere else. I had started pinning to reduce the projection when I remembered something from Beverly's Manual about taking in just the bottom cup depth.  A few pins later, the cups fit!  I think this particular method only works with my particular body type though. The only other alternation I had to make was taking a wedge out of the bridge under the arms. I found this change to harder to transfer to my  pattern than the others but thankfully the Manual had instructions for that too.

Picture of my super quick ALL BASTE STITCH tester in Simplex

FIT
It fits pretty well! The center gore is a hair too narrow - my fault as I just eyeballed the amount I needed to take in since it's pretty much need to take it in for all bras. Cups are pretty spot on after taking in the the lower cups only.  Still scratching my head on that one a bit - I've been TOO projected for many RTW unlined bras so this is a change. The dart I inserted in the  bridge could stand to be taken in a smidge more as well. Band is stretchier than I would like - the 32 fit more like a 34 as I have them on the tightest hooks. But that's an easy fix. I may double up on the medium powernet or just shorten the band next time.  Straps are pretty comfy and STAY on despite my sloped shoulders.

CONCLUSION
The Pin-up Girls Classic Bra Pattern is an excellent first (or second, third or sixth) underwire bra pattern.  Instructions are thorough with pictures and the patterns themselves are organized in a way that is easy to find.  While the full coverage style itself isn't earth shattering, it does make fitting easier and a well-fitting bra will beat a cute ill-fitting one any day. I forsee this pattern translating well into a nursing bra, demi cup and foam cup versions and for the intrepid, a sport bra (with the help of the Bra Makers Manual).

Recipe - Keto Fresh Orange Cranberry Muffin Recipe

After a VERY long break, we're back!  We're re-dedicating this blog to all mommy related things - minus the bra making track.  Bra m...