Saturday, January 1, 2022

Recipe - Keto Fresh Orange Cranberry Muffin Recipe

After a VERY long break, we're back!  We're re-dedicating this blog to all mommy related things - minus the bra making track.  Bra making related makes now has its own dedicated blog.

We had an overabundance of fresh navel oranges and a need for breakfast items.  Remembering that I had once made some yummy Orange Cranberry muffins using a WHOLE orange (skin and all), I decided to pull it out again.  This recipe was particularly memorable not because it was delicious but incredibly scary!  An entire orange! WITH SKIN!

It had been quite a number of years since I've made this recipe but I decided to try to make this keto (as most of my breakfast items are these days).  Since I was already making adjustments, I went ahead and dialed back the sugar level and upped the protein.

KETO FRESH ORANGE CRANBERRY MUFFIN RECIPE

INGREDIENTS
 

  • 1 LG navel orangeabout 12 oz / 340 g, preferably organic
  • 4 LG eggs
  • ½ CUP Greek yogurt
  • ¼ CUP sugar (we like Lakanto Monkfruit Sweetener)
  • 1 TSP almond extract
  • 6½ TBS coconut flour
  • 5 TBS almond flour (a bit more if you like a denser muffin)
  • 4 TBS Protein Powder (we like Standard Process Vanilla)
  • ½ TBS baking powder
  • ½ TSP baking soda
  • pinch of salt
  • ½ cup dried cranberryroughly chopped
  • 4 TBSP coconut oilmelted

INSTRUCTIONS
 

  • Preheat the oven to 375°F (190°C)
  • Wash orange and trim of about 1⁄2 inch (1.2 cm) off two ends.
  • Cut the orange into 8 pieces (remove any seeds) and put in the blender.
  • Add eggs, Greek yogurt, maple syrup, sugar and almond extract in the blender and blend until smooth.
  • Whisk flour, baking powder, baking soda and salt together in a mixing bowl.
  • Pour the wet ingredients into the dry ingredients and mix.  No need to baby it as there's no flour and no gluten to develop.
  • Add dried cranberries (save a small handful for sprinkling on top) and melted butter in the mixing bowl and fold in with a spatula.
  • Divide the batter into 24 mini muffin cups, top with cranberry (if desired) and bake for 12-15 minutes until a toothpick comes out clean.
  • Wait for 3 minutes and move the muffins to a cooling rack, let it cool for 10 minutes before eating.
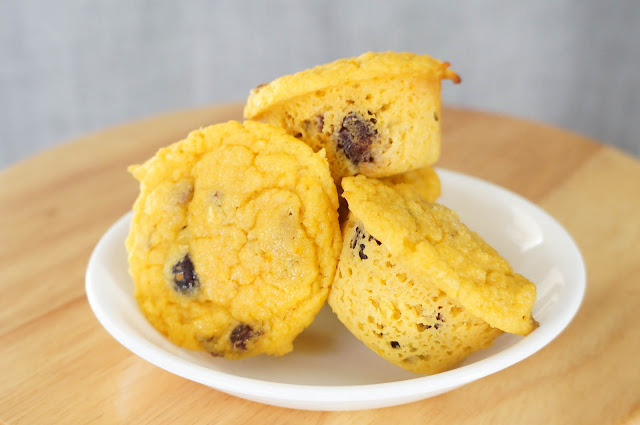

This makes a very light and fluffy muffin with plenty of sweetness and orange flavor.  We make quite a few keto friendly baked goods and this was on where the kids asked for more.


Here is the original recipe: https://cookinginchinglish.com/orange-muffin/

Thursday, February 1, 2018

Sewing Bras - Lace Shelley Bra - aka Bra Seam Manipulation


Its been a while since I've sewn up a regular underwire bra (2+ months!) while I've been focusing on the Strapless debacle - which lead to learning to draft a bra from scratch (multiple times!). [Check out my strapless bra adventures HERE].
Now that that major project has finished, I wanted something a bit simpler to work on.  Utilizing my new skills, I decided to turn my PUG Classic into the PUG Shelley Bra!  The drafting should be pretty simple - create a power bar out of the upper and lower cup pieces and then split the remaining lower cup.  Creating the power bar has the same steps as creating the internal power bar I talked about in a previous post.  [see HERE]  And splitting the lower cup is a fairly common alteration with a number of tutorials on the interwebs. [like HERE and HERE].  What will be new is making this bra almost entirely of lace!
I really like the delicate look of this bra.  It is such a nice contrast to the VERY structured strapless bra I spent the last few months on.  Working with lace came with its own trials and tribulations but sooo very worth it in the end.
ALTERATIONS TO PATTERN
  • Manipulated seam lines on the Pin Up Girls Classic bra to mimic the Pin Up Girls Shelley bra
  • Raised the side wings roughly 1/2" and tapered down towards back band.
  • Used alternate straps that calls for fabric to be folded down the center.
  • Manipulated the cradle to accomodate the lace
  • Inserted Gothic Arch
FOR NEXT ROUND
  • Widen the powerbar near the lower cup a bit.  Roughly 3/4 - 1".  Repeat for internal powerbar.
  • Lengthen the folded straps and remove the seam allowance along the neckline.  If using heavy duty upholstery interfacing again next time, use only a SINGLE layer.  The strap ended up quite thick at the attachment point.  Or perhaps try padded straps again.
  • Take a TINY 1/8" sliver off along the wireline for the inner lower cup pattern piece.
The fit is wonderful.  The cups are slightly more rounded (due to the extra seams) than the original.  It's my best fitting PUG Classic/Shelley bra yet!  This mostly stems from me *actually* applying my (newly acquired) knowledge of bra fitting to myself than the lace or construction.  Although according to the wire chart, I should be using the bridge from TWO sizes up from what I had been using.  I compromised by only going up ONE size (which also happens to coincide with my RTW size). The only thing I will add is that changing the cradle, while more comfortable, gave me a more natural look where the girls are not set as close together.  So neither pushed together, or facing East/West but perfectly parallell.

Recipe - Keto Fresh Orange Cranberry Muffin Recipe

After a VERY long break, we're back!  We're re-dedicating this blog to all mommy related things - minus the bra making track.  Bra m...